12/11/14

Continuing Watercolor (November and December 2014)

I worked on the background a little.  It needs to be darker to pop the giraffe forward.

I added more shadows and dark details to the face.  I glazed the background yellow.  The red needs to be moved around a bit (rather than all at the top).  I added red to the vest.  it needs another pass with some darker shadows.  I need to do the one collar with blue.  I need to do the buttons as well.

This could be done, I might do a bit of small things, but it looks OK.  Remember, I wet the branches and used  yellow green, dark green, and red brown to shade the branched and ends (the ends could use a bit of shadow and detail).  I wet the petal and dropped in yellow and red.  Later I added gray shadows over the yellow and red and between the petals and on the edge of some petals.  I added red and yellow to the middle as well as layers of dark (needs to be a bit darker still).  I used a very thinned gray to add the 'ribbing' on the petals.

I wet the branches and used yellow green, red brown, and dark brown to shade them.  The flower needs more work.

12/4/14

Continuing Watercolor (November & December 2014)

I made the background around the giraffe's head a bit darker and started to add some texture.  It is spotty and needs more, but it is a decent start.

I mixed a dark (blue and brown) and did his beard (basically scribbling) and his eye and eyebrow areas.  I painted a little on the glasses to define them.  I added some shadows to his face and neck.

I wet the background and painted in some strips of color.  I mixed a medium green and painted the center.

This is from another class.  It shows a different background and colors.  It is also a step further on the painting than the demo in class.

This is from another class, it is the start of this flower and needs lots more layers.  It is one using rubber cement as the background texture.

11/21/14

Continuing Watercolor (November & December 2014)

I worked on this a bit at home.  I added value and color to the top and started to add another strand of lights.  It's close to finished, a bit more needed on the background.

I worked on this at home adding some darks to the face and bottom of the body and lightening in-between the spots (I did this with white gouache and scrubbing).

In class I added a glaze of green gold.  Without green gold I would have mixed a yellow green as my glaze.  I seem to have missed a few spots, so I will need to glaze those.

First I wet the paper (very wet), dropped in color, and when the paper was slightly shiny, no puddles, I added sea salt.  Then I let it dry.  I transferred the drawing.  I mixed a brown for the skin (brown madder or burnt sienna and indigo works well).  The then started painting his face, paying attention to the values on his skin.  I then painted the hat with a dark, keeping a highlight in front.  I used cobalt blue to paint the shirt paying attention the the values (I usually put in the dark and then pull the color out with a clean, damp brush). 
Plastic wrap texture.  I wet the paper, added color, put plastic wrap on top and scrunched it, let it dry. 

I did a orange red glaze over the radish (except the white spot which needs to be softened...).  I added a purple red shadow on the radish.  I added a little dark right under the radish.  I added texture to the leaves and glazed the top leaf with green gold.

11/12/14

Continuing Watercolor (November/December 2014)

I added gouache to the bulbs and in a small area for highlights.

I scrubbed out some white lines on the giraffes body with a scrubber brush I made by cutting a cheap stiff bristle brush shorter and at an angle.

First I drew the radish, after putting it under a strong single light source.  I left out some of the leaves.  Then I transferred it to my paper.  Then I wet it and started painting using alizarin, cobalt, and primary yellow.  I mixed the shadow color from the colors I used in the painting  and dropped red and green into the shadow while it was wet.  I also added an additional dark right below the radish (the dark was made with indigo and brown).  It needs a bit of texture and a bit more shadow work.

11/6/14

Continuing Watercolor (November/December 2014)

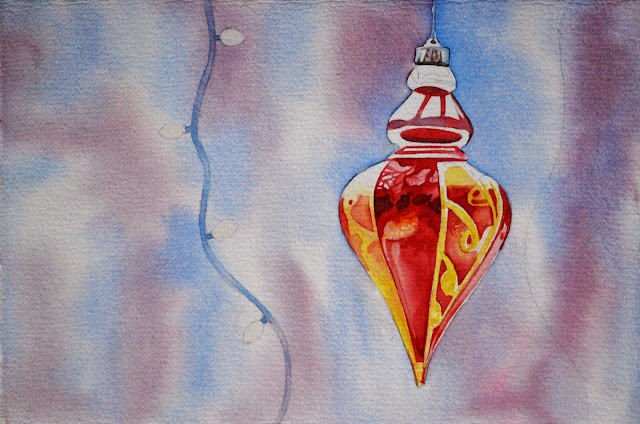
I worked more on the ornament adding values (remember, the lights and darks, the values, are most important).  There are a few areas I need to finish and details to add on the ornament.  I added a strand of lights.  I wet the stand and added cobalt in dots along the strand.  I wanted it to have the variation that it does.  I will add color to the bulbs.  I also plan to add 2 more stands (remember odd numbers work the best for the composition).

I worked on the face.  I did a first pass that was soft and then added the eyes, worked on the nose and the one ear, and worked on the horns - adding more values (especially darks).  I also worked a bit on the body (which needs more help...).  I wet the background (I really wet it so the paint will move).  I added a mixture of cobalt and yellow and touches of cobalt.  I left some areas white.

10/29/14

Continuing Watercolor (November & December 2014)

I started by wetting the background.  I left a small white area around the ornament so the color would not leak into the ornament. I dropped in cobalt blue and a mixture of cobalt and quinacridone rose and left some white.  I let this dry.  I came back and worked on the ornament dry.  I started in the darker area and pulled/guided the color out form the dark.  I used permanent alizarin and a little yellow.

I first showed you how you can wet and do each spot separately.  I then wet the area in which I was working (wet, but not supper wet) and dropped in color (burnt sienna and a tiny bit of van dyke brown) towards the middle of the spots.  It flowed outward.  I added a little van dyke brown in some areas.  I wet the mane and added stripes of color (sienna and van dyke brown).  I left the white highlighted area, but will probably add some light spots.  I also used a scrubber and lightened some of the areas around the spots.  I will work a bit on the form of the giraffe next as well as the face (we concentrated on mostly the pattern today).

10/16/14

Continuing Watercolor (September & October 2014)

I added cobalt to the hat and shirt to add shadows.  I also did a wash of cobalt to the background and softened the background texture.  I have a bit more value and detail work, but it's getting close.

At home I worked on the lower face at home to soften some of the blue dots.

I added dark values to the face and to the neck area (to the right of the hand).  I also added a wash to the hair in the front of the hand (the hand and the yellow background are a bit washed out in the photo, in person the hand is darker and the yellow is brighter).  This needs more work, especially on some of the spotty textures.

At home I added some dark washes on the right bottom side to define the petals.  It is what was needed for this flower.  I also added a bit of dark to the middle.

I added slightly darker washes to the background to define the petals.  I worked on the middle adding some texture and value.  I started to add some form and shadow to the petals (bottom left).

At home I added some washes to define the petals on the left side and some darks in the middle.

I added more washes to define the petals and some darks in the middle as well as lifted some highlights.  I started to add definition to the petals as well as shadows between the petals.

10/8/14

Continuing Watercolor (September & October 2014)

I worked a little on the necklace.  It needs more work overall.

I worked on this a lot.  The spots will need to be toned down and the values adjusted. 

I wet the paper and dropped in color trying to guide it to keep the whites.  I added salt (large and small salt).  After dry, I started adding a bit of texture to the middle and started putting in some shadows.

I wet the paper and dropped in the color.  I added salt (large and small salt).

10/2/14

Continuing Watercolor (September & October 2014)

I wet the background and added a dark.  The mixed dark is made mostly of colors that I have used in the painting already - cobalt, burnt sienna, alizarin, and indigo.  I will most likely add a glaze on top to soften the background patterns.  I will show you how to soften edges and 're-attach' the subject (it tends to look pasted on after adding a dark background).  I will need to finish adding details and values on the subject as well (which will also help to 're-attach' it).

I transferred the drawing onto the textured background.  I then started painting the subject paying attention to the subtle values.  Remember I worked on dry paper on the front of his face and pulled the value out with a damp brush.  On the back and top of his head I worked after wetting the paper.  

I removed the rubber cement.

I have started adding some values and colors to organize the chaos and to move the viewers eye around.  This one will work as an abstract I think.  It has a ways to go.

9/25/14

Continuing Watercolor (September & October 2014)


These chickens are examples of using rubber cement and watercolor to create interesting backgrounds and textures.

This was done background first.  I wet the paper (except her clothing) and dropped in strong color (green, yellow, red watercolor).  I superimposed the woman on top.  I painted her skin (paying attention to shadows) and the scrubbed and lifted the highlights.  The color underneath shines through.  She is of course not complete, but a good start.  The background is white gouache. 

Continuing Watercolor (September & October 2014)

An example of loose painting, very wet with salt.  Not finished, but a good start.

Continuing Watercolor (September & October 2014)

I worked on this a bit between classes.  I lifted and softened a few areas (water and a brush and paper towel).

I added some shadows and blue (cobalt) to the background.

I worked on this a bit between class.  I added red and indigo to the center.  Indigo only in the dark areas.  I used cobalt and a small brush to add lines for the stamen.  I added red dots for the ends of the stamen.  I darkened in between 2 petals (bottom left) and a little on the bottom right too.  I added a few more shadows to the petals.

I darkened around the petals and a little on the yellowish triangles between the petals.  I added a leaf and stem but it was too wet and is barely visible anymore.

I worked on her between class adding more darks and a few details in the value study stage.

I started to add color.  The skin is rose, aureolin yellow, and a tiny bit of cobalt.  The hair is a mixture of alizarin, burnt sienna, and indigo.  I painted it paying attention to shadows - notice the slight value shift from under the hat (darker) to the bottom and back of the hair (a bit lighter).  I painter the skin paying attention to slight value shifts and shadows..  I added cobalt to the hat as well as red to the ribbon on the hat.  I added red to the beads (to repeat the red in the hat).

This is the background for the gorilla.  I wet the paper and dropped in yellow and cobalt as well as indigo.  I let it flow and splattered, very fun.  I also added some salt.  I added splatters of red.  I was going to do plastic wrap but changed my mind.

This is a texture example.  I wet the paper, dropped in color, and laid down plastic wrap on the left side.  The 'bubbles' in the wrap make the light lines.  On the right side I laid down bubble wrap and placed something with some weight to hold it down. 

Texture painting with rubber cement.  I dribbled and brushed rubber cement onto dry paper.  Let it dry, wet the paper and dropped in color (yellow).  I let it dry and did another layer of rubber cement.  Let it dry and wet the paper adding more color (reds blues, yellows).  After this was dry I did another layer of rubber cement (this was the layer I demonstrated in class), let dry, and another layer of color.  Nest class I will remove the rubber cement.  This would work as a background for the gorilla as well.