1/25/22

Kate Zoom Watercolor and White Gouache Class


I wanted to point out that this would look nice with a light background as well.  It would be a different process.

This is how it looked at the end of the Zoom video from Jan. 18

This is how it looked at the end of the Zoom video from today, Jan. 25

This is how it looked at the end of the 2 extra videos


1/18/22

NCBG Painting and Drawing with Watercolor Pencils January 15, 2022

This is how the tomatillos looked before the additional work on the extra video.  

I worked on the left tomatillo on the upper husk.  I have more work to do in that area, but it's the same as was shown in the video.  I'm getting very close to being finished.


Kate Zoom Watercolor and White Gouache Class


This is the first layer of very light color.  The main purpose of this layer is to add color to the flowers.

This is how it looked at the end after adding color and value to the flowers (I still need to paint the little curly things on the front of the top left orchid...).

I mixed a brown with the 3 primaries (red, yellow, and blue) using more yellow and red in the mixture so it becomes brown.  I wet the background and then dropped in the color.  I also dotted it with blue (you can add blue or another color if you feel so inclined). We now have the underpainting done (except I still need to paint the little curly things on the front of the top left orchid, I keep forgetting).


1/17/22

CPSA Chapter 114 mini workshop, watercolor pencil


Using all of the colors used during the mini workshop as well as erasers and a white watercolor pencil, I made changes, correction, and added texture, color, and detail.  This is getting close to being finished.  I will spend a few weeks looking at it and making any additional changes/additions if needed.

NCBG Painting and Drawing with Watercolor Pencils January 15, 2022


I have worked on this more.  I have added details and made corrections.  The details and textures were added by using the erasers and the white pencils for light areas and adding darks and medium values with the watercolor pencil colors (dry).  The top left is unfinished still, it needs lights and darks plus details and texture.


1/15/22

NCBG Painting and Drawing with Watercolor Pencils January 15, 2022


This is how it looked after wetting and adding the yellow and the sanding texture.

This is how it looked at the end of class.  I have started on the dry work.

NCBG Painting and Drawing with Watercolor Pencils January 15, 2022


This is about 90% complete.  I have added layers of dry watercolor pencil (could switch to colored pencil for this part).  I have run a damp brush over the sanding texture in the background.

I will take a few weeks to look at, study, and make additions or corrections and any changes needed.  This is the process for my art towards the end.

This is after wetting the background and adding a texture called sanding.  We will do this on our pieces in class.

How it looks after it is dry and the plastic wrap removed.

This is after the pencil was activated/wet with water and a brush.  I added plastic wrap to make texture on the left side.  We will not do this to our pieces in class because it takes too long to dry.  But we will do this as an exercise.


This is the start of layering the dry watercolor pencil.

1/9/22

CPSA Chapter 114 mini workshop, watercolor pencil

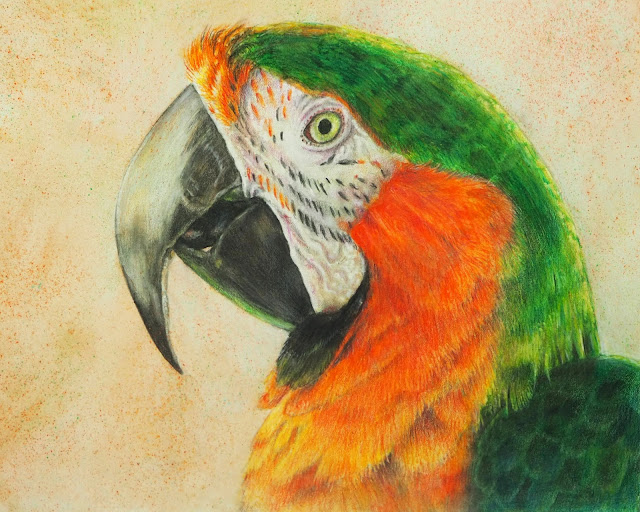
This is the photo of the artwork after the Zoom video.  

Keep in mind that the colors and values are not exact.

The rest of the photos are the stages of the parrot after working on it in the additional videos.  I am concentrating on values, light and shadow as well as detail and color.


This shows about how I would crop this.


Some final thoughts.  I have shown you a few ways to apply and use watercolor pencils as well as how to lift, erase, and make textures. There are many other ways to to use them. 

Watercolor pencils can be used 100% dry because they are colored pencils and the solvent is water.

Watercolor pencils can be used as watercolor and applied in a more painterly fashion for the entire process.  This is also true of regular colored pencils if used with solvent.

They can be used as an under drawing/under painting with colored pencil on top.  They can be used in mixed media pieces along with watercolor, pen & ink, and colored pencil.

I hope you enjoy experimenting and find new ways to use them in your work.  They are a fun and versatile medium!


1/8/22

CPSA Chapter 114 mini workshop, watercolor pencil


This is the parrot from the video.  It's a little past the middle of the process.  I have more values, color, and details to add (and subtract) as well as corrections to make.  The face and eye need a lot of work and then there will be some work on the feathers and the background as well as the beak.


This is the plastic wrap process I showed you in the video, but over a subject rather than just over color.  After finishing the dry layering process I laid out in the post below and demonstrated on the video, I wet the background (very wet), wet the parrot (a little more wet and messy then what we did on the video), and I added more color by sanding the background.  While still wet I laid the plastic wrap on the parrot and background and scrunched it.  Where the plastic touches the paper it will be darker than where the trapped air is located.

This is what it looks like after drying and after the plastic wrap is removed.  This is the point where I will use value and detail to bring the parrot forward from the texture.  It's somewhat similar to what we did in the video.  The difference is deciding what texture to leave and what detail to add.

We could not do this process today on Zoom as this took many hours to dry and a blow dryer does not help (a warm sunny day helps, but we did not have that, lol).

Keep in mind that the color shown here is not exactly the color as it looks in person.  I try to get as close as possible, but it is never exact.

CPSA Chapter 114 mini workshop, watercolor pencil


A warm yellow (W&N Sunflower)

An orange (Orange)

A red orange (Mandarin)

A yellow green (Grass)

A blue green (Lush Green)

A black or another dark (Black)

This is plastic wrap that we are not doing today.