10/25/21

Zoom Mixed Media October, 2021


I worked on the hair and the highlight part of the hair, I worked on the armpit, lol, I worked on the neck, and I worked on little areas of the skin and shirt.  All the things I did are subtle.

10/22/21

Zoom Mixed Media October, 2021


This is how it looked before I worked on it in class today with colored pencil.

This is how it looked at the end of the video.  It is really close to being complete.  I need to do the background and a little more to the hair as well as look it over to fins stuff that isn't working (like getting rid of some of my really dark transfer lines).

I used white, dark umber, pale vermillion, spanish orange, scarlet lake, indigo, black grape.  You may need to adjust or add a few colors to match what your piece needs. 

I added a light layer of black grape to the entire background.  This allowed me to add some dark near her face and the darken a few areas in the background that pulled the eye too much.  I added the light layers using the side of a sharpened pencil, with light pressure.

I also added more black grape to the hair and also added some scarlet lake to the hair.  I did a little work to parts of the skin and the front of the hair.  The light area on the top back part of the hair needs some shaping as does her arm pit and still more work on her neck, it's not quite right yet.  I will repost when I can get to all that and after looking things over and making adjustments.

10/19/21

Zoom Mixed Media October, 2021


I have worked more on this with the white and black ink.  I could keep going and finish this with the ink.  If I were going to finish with the ink I would do ink on the background as well and I would continue adjusting the values and detail on the subject, and add more color with watercolor. 

If you enjoy the ink keep in mind that there are colored inks as well.  Those with watercolor are beautiful, a friend and former studio mate of mine from when I lived in Tennessee works that way. 

In the next class we will work with colored pencil to show what the colored pencil can do over the ink and watercolor.

10/16/21

Zoom Mixed Media October, 2021

I cut sections of my drawing (forehead, nose, chin, shoulder) in order to re-align, re-tape, and re-do some of my drawing that left with the watercolor.

This is what was finished after the first set of videos (1a and 1b).  I used the pen & ink to start fixing some areas and add more lights and darks.

This is what it looked like after the second set of videos (2a and 2b).  I again added more lights and darks and started adding more detail.


10/15/21

Zoom Mixed Media October, 2021


The background made before class.

I transferred the drawing and did another layer of watercolor.  

I mixed a purple (ultramarine + quin. rose).  I painted the purple color onto dry watercolor paper.  While it was still wet I dropped in ultramarine and a little phthalo on the back of the head.  I dropped in rose and a little pyrrole scarlet on the front of the hair.  I painted the purple onto the shirt and dropped in ultramarine blue on the right and pyrrole scarlet on the left.  I pained the shadow areas of the small piece of cloth on the left shoulder using the purple.

I mixed a red orange color (pyrrole scarlet + permanent yellow deep).  I painted all of the skin with this color.  I used this to warm the skin up due to the colors I used for my background.  I makes the skin go towards the actual color of the skin and it makes the woman appear as if she is forward in the picture plane.  If your background is already warm you can skip this part or you can add a glaze of purple, blue, or green into the dark parts of the skin.

After this was dry I started using the white and black pens.  This photo is as far as i got.  If I work on this at home I will record and send a link for those who want to watch.  I will take photos and post as i get further along.  Next class will be colored pencil and maybe more watercolor before we start if I decide it's needed (and maybe to show you how that looks if I decide it's not really necessary).

Watercolor, pen & ink, and colored pencil


The watercolor portion.

The start of the ink, white and black.

This is one I would have liked to continue as pen & ink and watercolor only, but it was a class demo for people expecting to do colored pencil so I forged onward.

The color differences between all of these photos is due to the lighting where they were taken as well as what camera was used.

More ink and the start of the colored pencil.

More ink and more colored pencil.


This is how it is left.  It could use a little more work, possibly.


Pen & Ink and Watercolor

Ink wash

Pen & ink and watercolor tinting


Pen & ink and watercolor tinting

These are small and quick 8" x 10" pen & ink and watercolor pieces done in a mixed media one day class awhile ago. 


10/12/21

Zoom Mixed Media October, 2021


I wet the paper, I made it very wet (probably a little too wet).  I then added warm yellow (perm. yellow deep) and warm red (pyrrole scarlet) and the mixtures of the two colors.  I also splattered the colors as well.  When I moved the paper.  Later drips formed so I moved the paper to let them move around.  All of the drops went away due to how wet the paper was.

I made a glaze with the same 2 colors leaning it mostly yellow.   I glazed the entire surface and then splattered the paper while wet with a mostly red mixture.  This added more texture.


I wet the paper and dropped in purple blue (ultramarine) and cool red (quin. rose) as well as mixtures of the two colors.  I then splattered the colors as well.

After the paper was completely dry, I made a glaze with the same two colors and gently applied it over the entire surface to get rid of the white areas and make the texture more gentle.

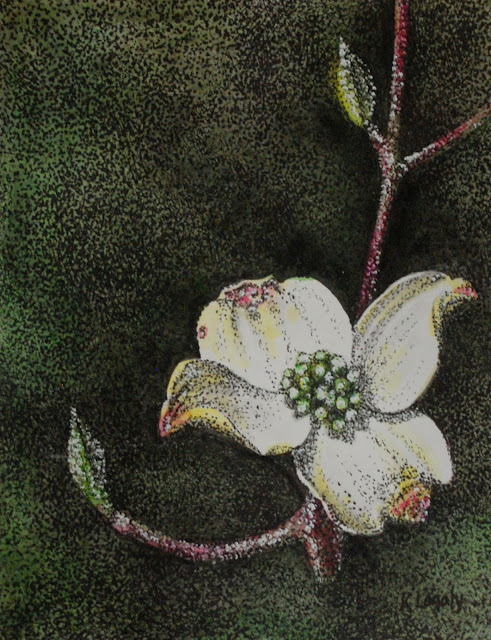
I wet the paper, dropped in green blue (phthalo blue) and cool yellow (aureolin yellow).  When the paper was wet and shiny (avoiding the puddled areas) I added course sea salt.

After the paper was completely dry I mixed the 2 colors to make a glaze (a glaze is the color with a lot of water).  I leaned the color towards the blue.  I then glazed the entire surface to knock back the texture a little.


Now, I need to decide which background.  

The purple one is pretty and will have a mid contrast since it's not a complimentary color or an analogous color.  I also happen to love purple.  

The red and yellow background is more analogous to the subject and will add a glow to the skin and the piece will have a warmth to it that will be nice.  

The green and blue one is complimentary to the skin and the colors will contrast more with the skin.  This background is more exciting and will add drama.

Any of these backgrounds will work, it just depends on which message or feel or look I want to have.  It depends on which one is speaking to me at the moment.  Still considering...