2/27/21

BAL Painting and Drawing with Watercolor Pencils, February 17 and 24


This was the last photo from the previous post in this series.  I had smoothed out the background texture.

Here I worked more on the zebra adding more shadows and adjusting little things all over the zebra. I added a few more layers of green to the background.

Added more shadows an erased and added white to some highlights.  Reshaped a few things, added more texture.  This is still in process, but it is close.  Not sure I will keep the background as green as it is currently.  This is the time I mentioned where I look at the piece of art a lot and make small changes.  If I decide to change the background that will be a large change which does sometimes happen at the end if something isn't working.

2/24/21

BAL Painting and Drawing with Watercolor Pencils, February 17 and 24


The demonstration zebra after class.

The demonstration zebra with a little dry work on the back behind the ear and the start of a different background. I will demonstrate this is class.


The demo sheet showing applying the watercolor pencil, wetting the watercolor pencil, lifting, erasing, light over dark, and sanding.


The demo sheet showing applying the watercolor pencil, wetting the watercolor pencil, lifting, erasing, light over dark, and sanding.

BAL Painting and Drawing with Watercolor Pencils, February 17 and 24

This was the end photo from the former post of this process.

I added watercolor pencil, green and brown.  I wet the bottom half so that you can see the difference between the dry and wet.

Finished wetting the entire background and wet the background into the mane.

I added more dry watercolor pencil to the background and worked on the zebra with dry watercolor pencil refining some areas and re-establishing the mane.

Worked on the zebra some more, all dry watercolor pencil.

Added another layer of dry watercolor pencil to the entire background.

Wet the background.  This Background would work fine.  I worked on the zebra adding darks and lights and some color.  All dry watercolor pencil.

I worked on the zebra some more adding darks and lights.  It still needs more work.  I smoothed out the background with dry whit pencil to show what that would look like.  I could wet it again or add more layers to keep working it.  It is not there yet.


2/23/21

Mixed Media with a loose watercolor underpainting with black and white pen & ink and colored pencil on top

This is posted to show you one of my mixed media processes.  This mixed media started as a loose, colorful, textured watercolor underpainting and salt.  I then used black and white pen & ink with colored pencil layers on top.  

Some of the photos in all of the posts were taken in poor lighting while I was teaching so the color is incorrect.

The start of the pen & ink.  Ignore the white paper peaking in from the side.  I could not get a shot of the pen & ink part completed since I started the colored pencil early for demo/time purposes.

Colored pencil started.

WIP


2/22/21

Mixed Media started with an unrelated drawing superimposed over an abandoned watercolor painting

This is posted to show you one of my mixed media processes.  This was a painting of a man in watercolor that I lost interest in finishing.  I pulled it out one day and decided to superimpose an unrelated drawing in colored pencil on top to see what I could come up with.  I do this every so often with my abandoned paintings. 

I started the value drawing with the white pencil.  

A little more value drawing (wish I would have photographed the value drawing after it was completed).

The layers of colored pencil being added over the value drawing and the background.  At this point I am thinking it needs something more to tell the story that is evolving.  So I added more figures with colored pencil into the background. 

"Atonement"  15 x 22


Mixed Media started with a textured, monochromatic watercolor background

This is posted to show you one of my mixed media processes.  I start with a monochromatic watercolor background.  I transfer the drawing and start with a light colored pencil value drawing, usually using white but every so often I use something like one of the 10% grays or light peach or cream.


The start of the value drawing with white.

I started adding color on one side as a demonstration in a class.

"Fade to Blue" 15 x 22


Mixed Media with a more realistic watercolor underpainting


This is posted to show you one of my mixed media processes. I started this piece as a more realistic watercolor underpainting of the subject.  I finished with layers of colored pencil.

"Traditions"  15 x 22

Mixed Media with a more realistic watercolor underpainting

This is posted to show you one of my mixed media processes. I started this piece as a more realistic watercolor underpainting of the subject.  I finished with layers of colored pencil.


"Dyed in the Wool"  15 x 22


Mixed Media with a colorful watercolor underpainting


This is posted to show you one of my mixed media processes.  This mixed media started as a loose, colorful watercolor underpainting and was finished with colored pencil on top. 

"Thinking Ape"  11 x 15
 

Mixed Media with an semi-abstract colorful underpainting


This is posted to show you one of my mixed media processes.   It started as a loose abstract watercolor and watercolor pencil underpainting, then a dark watercolor layer was added, and then it was finished with the layers of colored pencil. 


"Primal" Thought  15 x 22
 

2/21/21

GNSI-C Fun with Fur, February, 2021, Colored pencil on tan paper, Deer

Step 1.  I typically start on colored paper using a white colored pencil.

Step 2.  Using light peach, cream, peach, and burnt ochre I started shading in the color.  I shade mostly in the direction of the fur to avoid issues later.

Step 3.  Using Raw Umber and Ginger root I added some darks, lights and more color.  Still working mostly in the direction of the fur.

Step 4.  Using all the colors as needed, I start adding the fur texture.  This involves some line work and breaking the edges of the spots.

Step 5.  I added more texture and started refining.  This will need the end process of studying, correcting, and refining which takes time before finishing.


GNSI-C Fun with Fur, February, 2021, Watercolor and White Gouache, Cow


Step 1.  I wet the paper and covered it in a medium version of the fur color.

Step 2.  After its dry, I used the color and several darker versions of the color to add some darks.  I'm using some negative painting.  This step helps me see the shapes better.

Step 3.  I added more darks on the front pieces of the fur.

Step 4.  I added more darks and a few stands of white with the white gouache.

Step 5.  I added layers of white gouache to make strands of light hairs.  I also continued to add darks, especially some in thin lines for some of the hairs.  This is in process and would need more time looking and refining the shapes, values, and textures.

GNSI-C Fun with Fur, February 2021, Mixed Media, Zebra

Step 1.  Wet the surface and drop in color.  The paper needs to be wet enough that the color moves,  I used a mixed red brown (burnt sienna will work), ultramarine blue (cobalt will work), and mixed brown (neither a red or yellow brown, burnt sienna with a little blue will work).


Step 2. After it's dry, I wet the stripes and added a dark blue (something like indigo, indanthrene blue, anthraquinone blue or phthalo blue mixed with a little yellow and red will work).  I dropped in the red brown in a few areas that are warm.  I wet the ear and also added some color to the ear.  I wet the mane and added some color there as well.


Step 3.  After its dry, I added black ink.  When I add the ink I can render it loosely as I have done here.  Or I can add it in a tighter more controlled fashion.  Either will work for this subject.

Follow the direction of the fur.


Step 4.  I then added the white ink using it in particular for breaking the straight dark edges of the stripes and mane. 

Follow the direction of the fur. 

Sometimes I finish the mixed media with the pen & ink, which would work great for this subject.  But, since I wanted to also show some colored pencil I will move on to the next step.

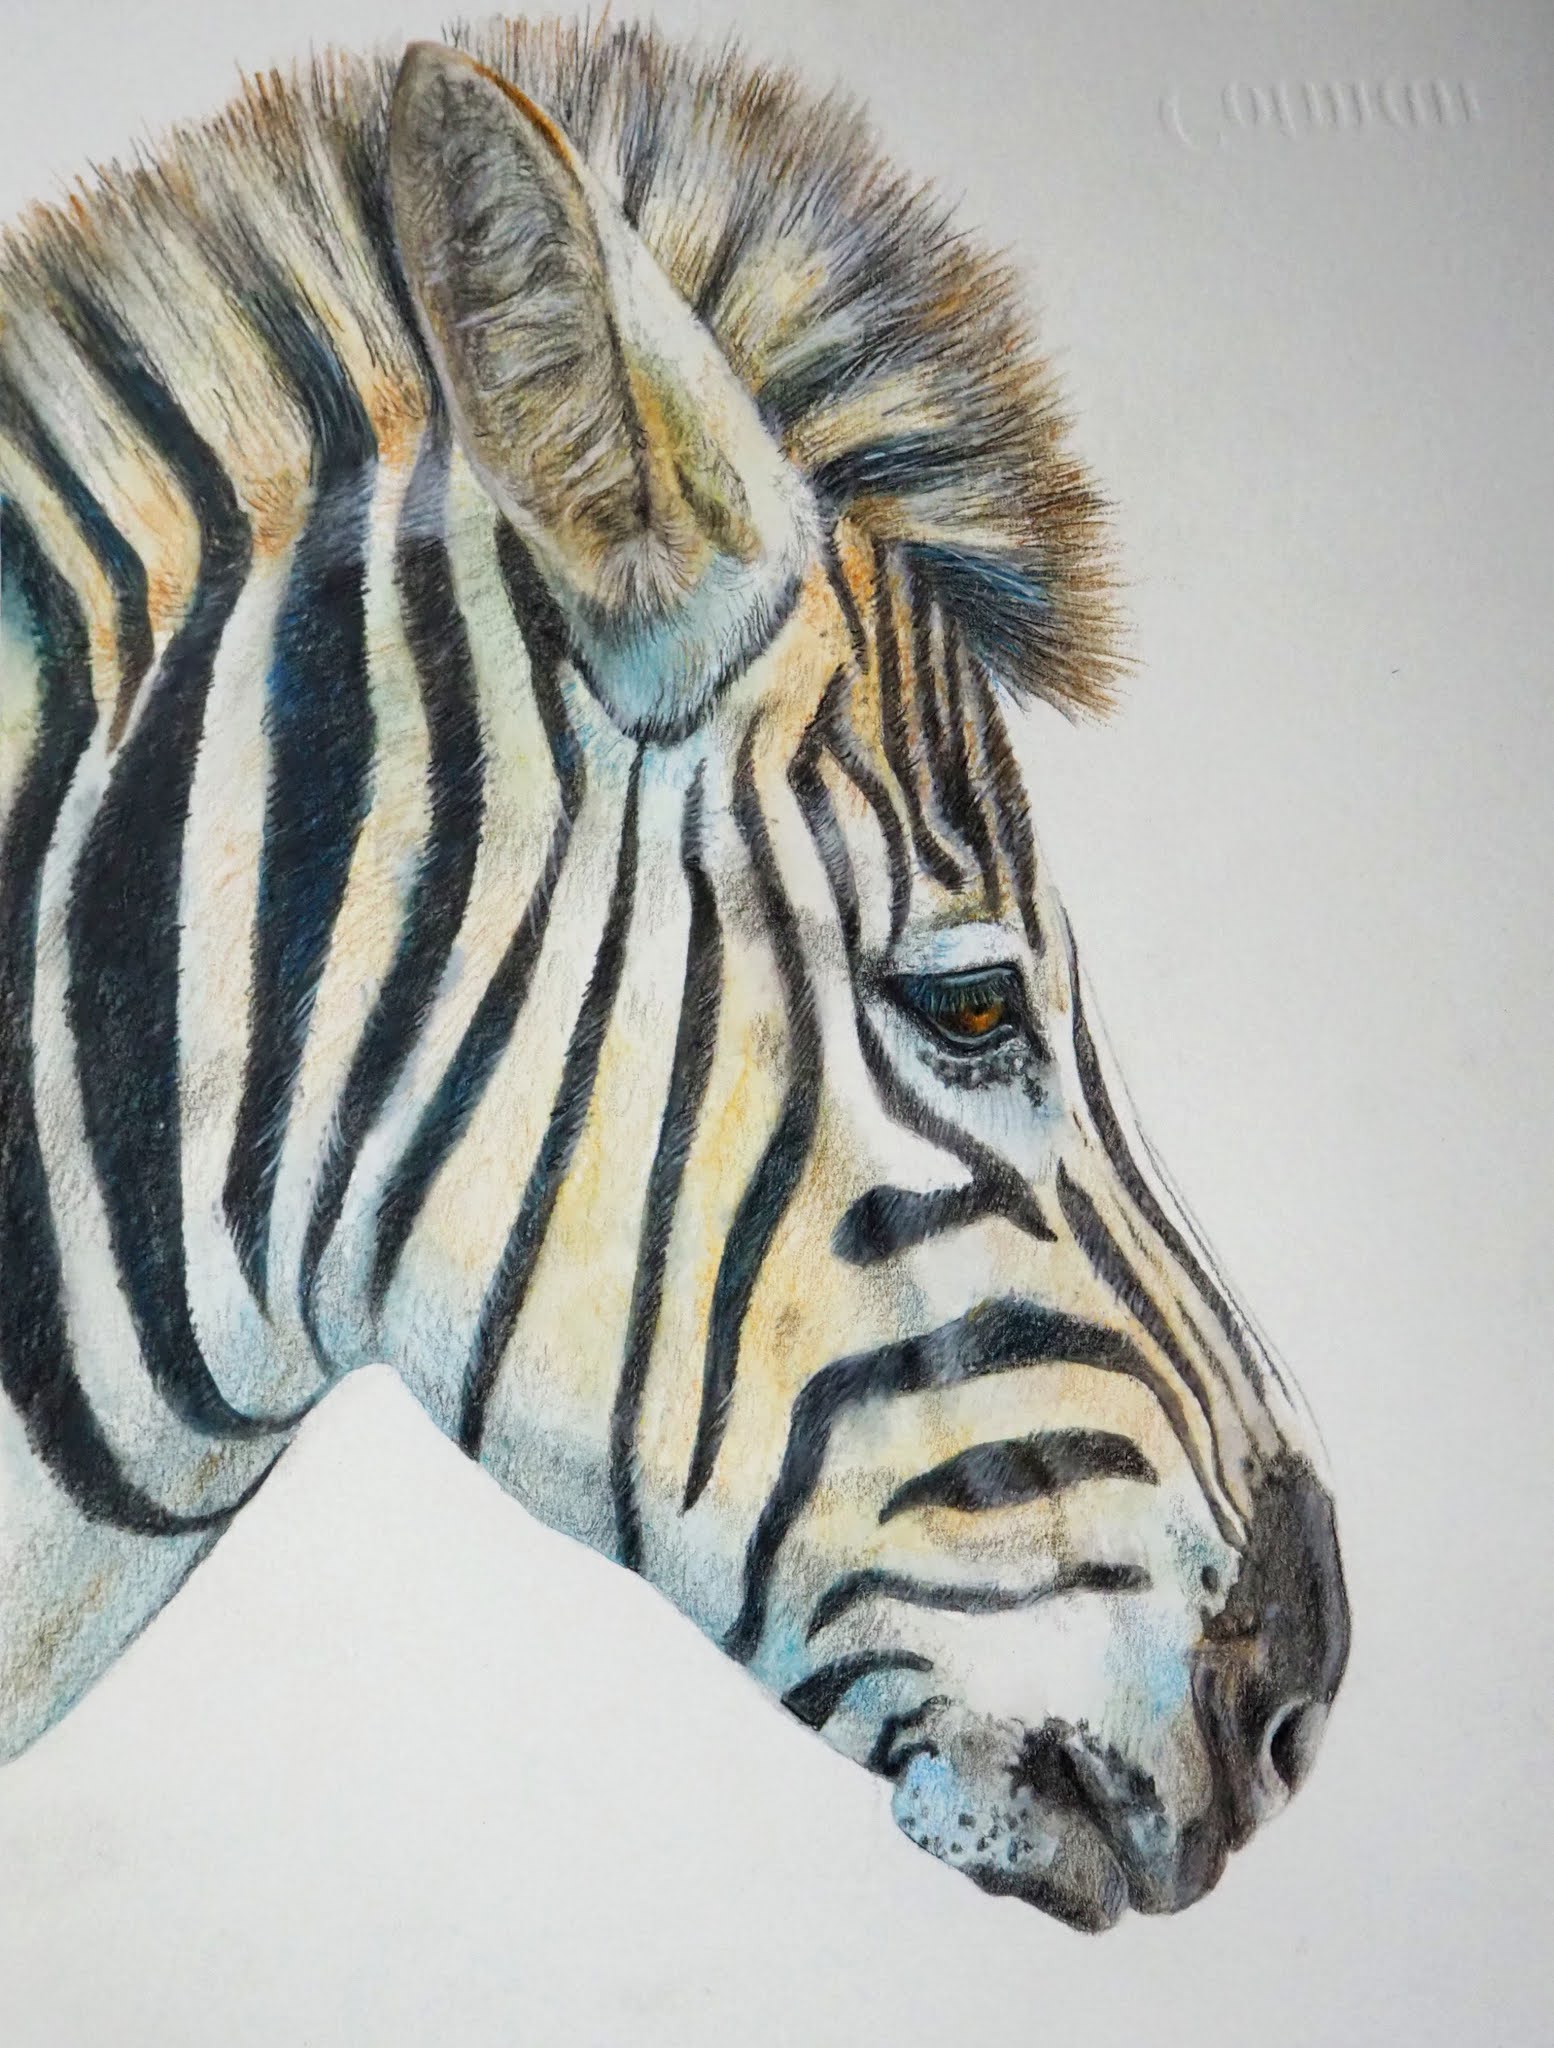
Step 5.  I started adding colored pencil.  I used white, black, burnt ochre, ginger root, true blue, Spanish orange.  I used it to soften some of the areas, add more texture and values.  I also started adding some details.  This is far along but not completed yet.  The end of the process is mostly looking and making adjustments.  It takes time.