3/31/16

Continuing Watercolor (March and April 2016)

I added some darks to the head and legs (need to do this on the reflection as well) and did a bit more detail work.  It still needs a bit more to be complete.

I worked on more petals (will they ever end...).  I demonstrated white gouache as well on here.  Quite a bit more to do before the masking can come off.

I started by wetting the top hood of the tractor.  I then dropped in a mixed brown, some red, yellow, orange and blue as well.  While it was still wet I used watercolor pencils (red, blue, and brown as well as some sand paper.  I sanded the watercolor pencil onto the wet area to get the speckled texture (it's called sanding).  For the bottom middle I wet the areas, dropped in color, and while it was wet/shiny, but not puddles, I dropped in sea salt to get the texture.  Later, after the textured area was dry, I added the dark shadow to the tire to push it back from the tractor body.  The front wheel was wet, a dark and some red dropped in - I meant to add salt, oops.

NCBG Beginning Colored Pencil (March 2016)

I worked on the petals on the left side and did a bit more refining.

I continued the background, it needs a bit more smoothing work.

I added a background in class.  I used Black Grape as well as some Canary Yellow and Grass Green.  It still needs a bit more added as well as some smoothing and refining.

3/25/16

Continuing Watercolor (March and April 2016)

I added shadows and removed the masking.  I softened the masking where needed and added darks and details.

I worked on shading the petals both in the foreground and background. I added some background texture with purples and greens. This one has quite a bit of work left.

I transferred the drawing deciding what details to trace as I went.  I mixed a green and painted the background and the two back tires green.  This helps me to see what I have.  

3/23/16

NCBG Beginning Colored Pencil (March 2016)

I added a background making it a bit darker with Black and Black Grape.  I have no finished it or taken it to the edges yet.

These are the blueberries from the instruction sheet.  I have worked on a few more blueberries and some stems.  Still have some blueberries and stems without any refining work done to them.

The demo from class.  I did the beginning 3 steps on a few blueberries.  I used True Blue and did a value drawing.  Then I used Pomegranate placing it where there was red, orange, brown, and darks colors.  Then I placed Canary Yellow where it will be green, orange, and brown. I worked on the top pat of the stem until it is close to complete. I used true Blue and Pomegranate in several layers, a little Canary yellow, and then Black Grape on the dark areas and White on the highlights.   

3/21/16

NCBG Beginning Colored Pencil (March 2016)

White pencil, shade the highlights.

Canary Yellow over all the white  (as shown on the left petals).  Next start adding Pomegranate to the shadow areas (shown on the right petals and center).  Add Grass green to the stem.  Start adding Dark Brown to the middle as well as White highlight spots to the middle.

Using White, Canary Yellow, Pomegranate, Cadmium orange, and Indigo Blue continue refining and adding highlights and shadows.  I added the textures to the middle of the flower with white and then added color.  I added some deep shadows with Indigo Blue.  I used White again for some highlights.  I used Canary Yellow, White, and Cadmium orange to do the highlights and shadows on the petals.  I made a shadow on the stem under the petal with a little Indigo Blue and Canary yellow.


Prismacolor Colored Pencils on a dark grey mat board

3/16/16

Continuing Watercolor (March and April 2016)

I added a small amount of masking to the bird and on the sand and reflection.  I added more masking to the water to do the foam.  I then did more washes to the sand and the water.  I gently scuffed up the masking on the water and on the bird's chest and did another wash making sure the paint went into the textured spots.  I added a few more shadows to the bird and the reflection.  I added a shadow under the wave.

I drew some flower shapes in the background with a pencil.  I added a bit more masking.  I added textured green as well as purples to the background and behind some of the petals.  I added some darks and dropped in some lighter color to create texture.  I painted some of the petals a light reddish purple.

NCBG Beginning Colored Pencil (March 2016)

Worked on this a bit more, refining with all 4 colors.  It needs more darks and details.

The demonstration first pass with Pomegranate lightly shading the values.  (The color and quality are off as it was taken with a cell phone and in class)

The demonstration from class after the Canary Yellow, Pomegranate, Grass Green, Dark Brown, Cadmium Orange Hue, and White on the center, stem, and right petals.

NCBG Beginning Colored Pencil (March 2016)

White colored pencil on dark gray mat board.  Shade the highlights, lightly.

Canary Yellow over all the white  (as shown on the left petals).  Next start adding Pomegranate (shown on the right petals and center).  Add Grass green to the stem.  Start adding Dark Brown to the middle as well as White highlight spots to the middle.

3/15/16

NCBG Beginning Colored Pencil (March 2016)

Pomegranate, shaded the values using a light touch.

Canary Yellow, lightly cover the entire flower.

Grass Green, lightly shaded over the stem and middle of the flower.

Layered colors in the middle to create a pattern and some texture.  I used layers of Dark brown, and Pomegranate over the previous layers.

Used White to make highlights and textures on the center of the flower.  Also use Pomegranate, Grass green, and Dark Brown on the center to add more color and dark values.  The right side petals have more refining with Canary yellow, Pomegranate, Cadmium Orange Hue, and White.  I used Canary Yellow, Grass Green, and White on the stem.

Strawberry ExerciseDone on Strathmore


Done on gray paper with a limited palette of Indigo Blue, Pomegranate, Canary yellow, White (Prismacolor)

3/9/16

Continuing Watercolor (March and April 2016)

We are working on this with a limited palette.  Three colors - lemon yellow, prussian, rose (you can substitute the colors for one that you have if you do not have these exact 3).  I started with masking on the front of the bird and it's reflection as well as some dots and squiggles in the foam at the front of the water.  On the reflection keep the white marks horizontal to get a water feel.  After that was dry I mixed a neutralized blue with prussian and an orange mixed with the rose and lemon.  To neutralize or tone down a color use its compliment, or opposite, on the color wheel.  I then wet the paper and painted the color going in a horizontal direction.  I used paper towel to remove color from the foam area. 

I wet the paper, and using 2 of the same 3 colors as I used for the bird I mixed a purple and dropped in color (the rose, purple, and blue) I used light color.  After that was dry I masked some of the flower centers and stems, and petal edges.  

After the masking was dry I used the purple, rose, and blue again and worked on the bottom section making a hard edge.  I worked on dry paper, but if you wish you can wet the area before you paint it.  Next I worked near the top adding some dark and pulling the color out (and adding a bit more light color as well) with a damp brush.

NCBG Beginning Colored Pencil (March 2016)

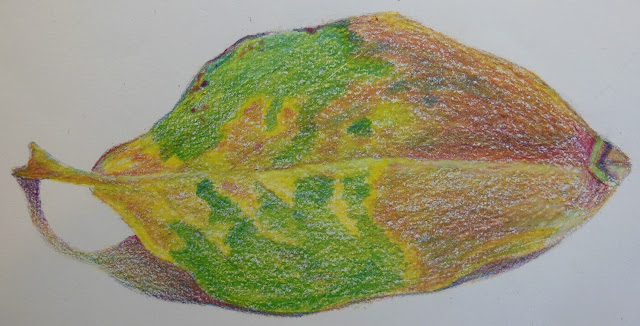
1. Start with Canary Yellow first using light pressure and the side of the pencil lead.  Cover the leaf and the shadow areas.

2. Pomegranate next using light pressure and the side of the pencil lead.  Cover the parts of the leaf that will be brown as well as the shadow areas.

3. Indigo Blue last using light pressure and the side of the pencil lead.  Cover the areas that will be green and the darker parts of the shadow areas.

4. Using all 3 colors, still light pressure and the side of the pencil, add more color as well as darks.

5. Using all 3 colors (especially yellow), add more layers using the side of the pencil, but with heavier pressure.  This will begin to mix the colors and cover the paper.

6. Using All 3 colors and the white pencil - darken, refine, and blend the colors. Continue adding details, and values (lights and darks). This will require heavier pressure and at times the point of the pencil.

Finished leaf (or mostly finished...) after a bit of refining and detailing with all 4 colors.  This requires heavy pressure, burnishing, and sometimes the point of the pencil.
Leaf from class demonstration.  It is of course not complete.